The Kingdom of the Emerald Hills
https://amtgard-eh.com/forums/

From the Regent: Make more stuff! Post it here!
https://amtgard-eh.com/forums/viewtopic.php?f=55&t=3222
Page 1 of 2

Author:  terrik [ Thu Jul 07, 2011 1:03 pm ]
Post subject:  From the Regent: Make more stuff! Post it here!

Let's get our A&S on! Make stuff and post pictures of it on here. Especially you over there - the one that says your crafting isn't good enough for DragonMaster. You know who you are.

Here's something from me: first attempt at making a shield.

Image
Cut the shield blank. Sharp, non-serrated blade seems to be the way to go.

Image
Glued on a fabric cover to the inside, taped down the edge with duct tape and then wrapped it with athletic tape. Mostly to cover up the nasty glue residue left on the surface of the duct tape - but hey, it looks nice.

Image
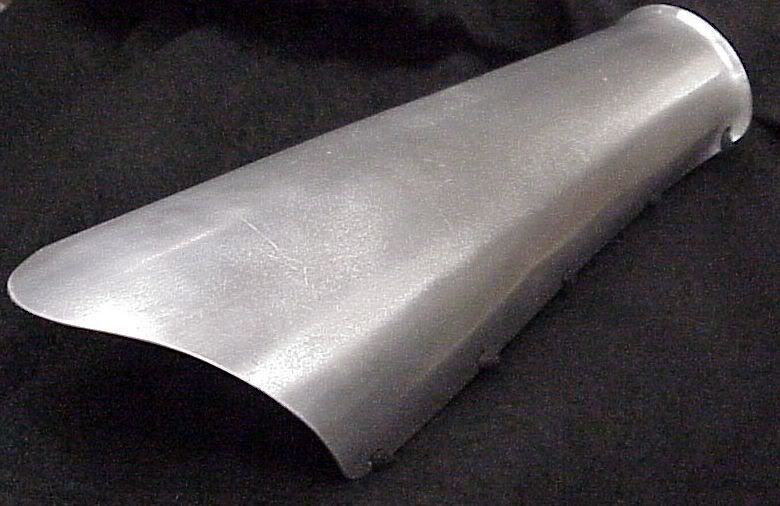
Side view of the foam core.

Image
I wanted a nice squishy handle, so I layered 3 pieces of weatherstrip felt and wrapped that with athletic tape to keep it together, then wrapped the whole thing in leather.

Image
Finished straps, shield cover on. The front side of the shield is reinforced with leather at the strap attachment points. I should probably take a picture of that too.

Image
Front of shield.

Question, shield-makers: What do you do with the edges on your shields?

Author:  Aria [ Thu Jul 07, 2011 1:08 pm ]
Post subject:  Re: From the Regent: Make more stuff! Post it here!

we edged our large shield with pipe foam

Author:  TigerHawke [ Thu Jul 07, 2011 1:45 pm ]
Post subject:  Re: From the Regent: Make more stuff! Post it here!

We've used a strip of blue camp foam before on shield foam edges. I really like the idea of weather stripping felt, something to try in the future now that we finally have a lot of shield foam.
Most of us, up here, make shields out of kid's round sleds, so pipe wrap is used there. GT and I drill holes all around the shield edge and lace the pipe wrap on.

btw spray adhesive works great to glue fabric down, or camp foam onto a plastic shield core. It holds well, but it is also easy enough to be able to pull the camp foam off should you need to.

Author:  Voshe [ Thu Jul 07, 2011 2:08 pm ]
Post subject:  Re: From the Regent: Make more stuff! Post it here!

Entered these two into an A & S last year.

This 60" PVC longbow has a 32# pull. It has a core of 3/8" pultruded fiberglass rod, plastic spacers and aluminum. It will accomodate any firing position right or left handed. The bow can be strung in either position to counter the PVC taking a set, which would weaken the bows pull.

Image

Image

Image

Aluminum vambraces, with a powdercoat finish.

Image

Image

Image

Author:  terrik [ Thu Jul 07, 2011 2:15 pm ]
Post subject:  Re: From the Regent: Make more stuff! Post it here!

Nice work there, Voshe. Plate is next on my list of things I want to learn how to make.

Author:  Voshe [ Thu Jul 07, 2011 3:26 pm ]
Post subject:  Re: From the Regent: Make more stuff! Post it here!

Thanks. Making a set of paulderons with spaulders now. Hopefully, one side will be ready for this weekends fun n games.
Image

Author:  terrik [ Tue Oct 11, 2011 10:43 am ]
Post subject:  Re: From the Regent: Make more stuff! Post it here!

Made some woolen Viking leg wraps. Also blacksmithed some steel pins to go with them.

Image

Author:  terrik [ Wed Nov 16, 2011 5:28 pm ]
Post subject:  Re: From the Regent: Make more stuff! Post it here!

Image

More blowtorch blacksmithing. This time I tried some curly bits at the ends and hammered out a pin instead of modifying a nail.

Author:  Alby Kzan [ Wed Dec 21, 2011 10:28 pm ]
Post subject:  Re: From the Regent: Make more stuff! Post it here!

Hey could you awesome crafters do a write up of the step by step process you took to make this stuff to help guide new individuals who wish to try and duplicate these awesome items. Pictures of each step would be great to.

King Alby

Author:  Aylin_Karyn [ Tue Mar 13, 2012 3:23 pm ]
Post subject:  Re: From the Regent: Make more stuff! Post it here!

I hand-dyed silk, cut it in half, sewed 4 lengths of lead-weight cord together and then into the hem of each piece. Sewed a loop of macrame into the hem of each and attached a swivel key ring. Cut, holed, and grommeted the finger loops of scrap leather and clipped the key chain ends on.

Attachments:
2.jpg
2.jpg [ 89.15 KiB | Viewed 23958 times ]

Author:  Voshe [ Fri Jun 08, 2012 9:52 pm ]
Post subject:  Re: From the Regent: Make more stuff! Post it here!

I made another big flurby sword. 14" crosspiece 56" total length 17 1/4" from pommel to strike legal side of crossguard.

Image

Image

Author:  Aylin_Karyn [ Thu Nov 15, 2012 10:53 am ]
Post subject:  Re: From the Regent: Make more stuff! Post it here!

Aha! I have mastered posting images:

Freehand sketched on wood, woodburned, painted with watered down acrylics.
Image

Box weave macrame belt (like those plastic lanyard keychains kids make):
Image

My first applique (Rarity MLP character):
Image

Author:  Aylin_Karyn [ Mon Nov 26, 2012 12:25 pm ]
Post subject:  Re: From the Regent: Make more stuff! Post it here!

Image

Author:  Yufuki [ Mon Nov 26, 2012 1:28 pm ]
Post subject:  Re: From the Regent: Make more stuff! Post it here!

Love that rose!

Author:  Aylin_Karyn [ Mon Dec 10, 2012 10:36 am ]
Post subject:  Re: From the Regent: Make more stuff! Post it here!

Pine plank chair with original lion head design.

Image

Image

Image

My construction isn't very good, but I am quite pleased with the progression of my pyrography.

Page 1 of 2 All times are UTC - 6 hours [ DST ]
Powered by phpBB® Forum Software © phpBB Group
http://www.phpbb.com/